
Showing posts with label Tool. Show all posts
Showing posts with label Tool. Show all posts
08 April, 2025
21 December, 2022
03 July, 2013
Photoshop: Tips & Tricks
- 500 pixels = 17.64 cm = 6.944 inches
- Strg+ Left click on layer to select a marquee around the shape in that layer
- Image à Adjust à Desaturate (Shift+Strg+U): extracts colors out of the selected picture (depleting the image into a black & white mode)
- Layer à Overlay: makes layer transparent
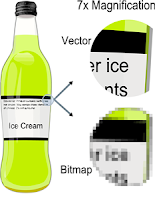
- Rasterizing a layer: converting it into pixels to make it a paintable layer and looking pixelated so you may apply any filter to blur, distort or add texture to your picture. Once the layer is rasterized, it becomes a bitmapped image consisting of a series of tiny squared pixels. The opposite is a vectored graphic made of hundreds of thousands of tiny lines or curves which always appear smooth when enlarged e.g. font size. File types: .drw, .pif, .pct, .ps, .eps, .svf, .ai, .ait, .art, .cdr, .cdrw, .cdt, .pat, .dlg, .do, .odg. Photographs (.png, .tiff, .psd) are not vector graphics.
- To conveniently highlight an area of similar color, use Quick Selection Tool / Magic Wand Tool (W)
- Right click on desired layers and choose Duplicate Layer
- Use the Blur tool (R) to touch up the outside edge of a foreground, especially where the image seems pixelated. This will help to create a sense of transition between your foreground and background which is easier on the eye.
- To blur an image in Photoshop, select the area then choose from the main menu Filter > Blur > Blur: The Blur filter smooths the transition between color changes. The "Blur More” produces the same effect at about three times the strength of just “Blur.”
- Use Strg+F to repeat last command
- Or choose from main menu Filter > Blur > Gaussian Blur: play around with different blur radii to create the background effect you want. The larger the radius, the blurrier the image, so for a subtle effect, aim low.
- Or choose from main menu Filter > Blur > motion Blur: modify "distance in pixel" value to desired fuzziness level displayed in the preview window then click OK
- Use Paint Bucket Tool (G) to fill selection with color
- With the Eraser Tool (E), adjust its opacity (expressed as a percentage) to influnece its removal efficacy. To erase as thoroughly as possible, use a high percentage value. But for edges, a low opacity can be used to create a softer, subtler effect. Applying low-opacity eraser repeatidely over the same ares has a cumulative effect, so opt for low opacity where necessary.
- With the Lasso Tool (L), adjust its feather (measured in pixels) to soften the edges of your selection, making the edges subtler and more forgiving. A good starting value is between 1 and 3 pixels. The higher the number, the softer your edges will become. To add to an already-completed selection, hold down the Shift key while continuing to select. To subtract from an already-completed selection, hold town the Alt key and select the area to unselect.
How to straighten a picture in Photoshop

- Select Measure Tool under Eyedropper „I" from palette
- Click and drag a line along the currently-incorrect horizon
- Chose Image à Rotate Canvas à Arbitrary à OK
- If necessary, "crop" the picture to remove excessive background
Source = YouTube Video
17 June, 2013
ToDos
- http://www.manscaping.info
- http://www.manscaping.info/Trimming.htm
- https://www.stopbadware.org/common-hacks
- http://www.google.com/support/webmasters/bin/answer.py?answer=45432
10 June, 2013
FotoShop Tutorial
To fill an area with color:
- choose magic wand tool (W)
- set tolerence = 1 then click on desired area
- to preserve text, choose lasso tool (L) then
- click on “add to selection”and
- click, drag & let go around a label to enlarge your selection
- choose PaintBrush tool (B)
- select desired brush size
- set painting mode = multiply {to preserve text}
- paint with cursor
- select è deselect (Ctrl+D) when done
Ø Source = http://www.youtube.com/watch?v=wMsmeaWx78Y
27 May, 2013
Tutorial to create a transparent background in Photoshop
First if the layer is locked (padlock icon), unlock it by double-clicking on it.
Method 1:
- select Magic Wand Tool (hit W)
- click on white background you wish to remove
- hit Del-key " (Entf or backspace) to delete it
Method 2:
This option is only available in version 7 or higher:
- select "Quick Selection Tool" from magic wand menu (hit W)
- click and drag around the area you wish to keep
- copy the chosen area (Strg+C); click on eye icon to hide current layer
- create a new {2nd} layer and paste clipboard into it (Strg+V)
- delete original {1st} layer
Method 3:
- click on "Select" è "color range" from drop-down menu. The cursor is already in sample mode (pipette) by default.
- using the colour-picker, chose white area in picture to select the background including all white pixels in entire photo (PS: white area in "color range" sub-window shows selected pixels; black indicates unselected parts)
- click on ok to release the eyedropper-tool and close "color range" sub-window. Then:
- either hit Del-key (Entf or backspace) to delete selection
- or click on "Select" è "Inverse" (Strg+Alt+I) to copy/paste area to new layer
- if there are any more white bits still left to remove:
- click on "Select" è "color range" from drop-down menu
- chose "highlights" from drop-down menu inside "color range" sub-window
- click on "ok" to close "color range" sub-window
- use "Eraser" tool (E) to apply it to selection by clicking the rubber circle on highlighted area
- hit Strg+D to deselect area
Method 4:
- select "magnetic lasso tool" by right clicking on lasso tool then choosing the magnetic lasso tool from the popup menu
- select the area you wish to keep by clicking left-mouse-button along the edge of the desired shape until you loop it back on itself
- every left-mouse-button click creates a bullet point to remember the path. Hit Del-key (Entf or backspace) to delete previous bullet points; if wrongly placed
- make sure last click is on top of original starting-point to complete area
- choose "Inverse" (Strg+Alt+I) then hit Del-key (Entf or backspace) to delete selection
Using GIMP:
- select: Layer » Transparency » Add Alpha Channel
- delete background
- export as PNG format
Additional notes:
- Use Strg+D anytime to deselect chosen area.
- Definition of "Anti-alias": when this option is selected, it will gradually smooth out the edges around the colored areas affected.
- Definition of "Tolerance": The Tolerance setting determines how different a color can be from the sampled color. When using the eraser or wand tool, set the tolerance based on the sampled color. The lower, the stricter! A lower tolerance limits erasing to the sample color and colors similar to it. If you increase the tolerance, the eraser brush will begin erasing more than just the sampled colors.
- Pictures containing transparent background can be saved in a variety of formats including GIF {poor quality}, TIFF, PNG {better quality}, SVG and PSD. Whereas JPG and BMP formats do not support transparency.
- GIFs only support up to 256 colours. This is why your quality is degrading. There is no way around this.
- The GIF format is not as good at compression as JPEG or PNG.
- GIFs are quite large or badly compressed files.
- PNG format is recommended for preserving transparency
- use GIF to animate layers
- If you find ugly edges around the image when you place it against a different background color, apply this solution.
Credit: Source
Related Useful Links:
- Tutorial on lasso tools.
- Create animated favicon.
- Online picture editor.
- Create multi-tabbed-widget in blogs.
- Create multi-tabbed-widget in blogs.
- Create multi-tabbed-widget in blogs.
Subscribe to:
this blog
