Showing posts with label Photos. Show all posts

27 August, 2024

Gimp PlugIn for Texture Synthesis

Gimp-ReSynthesizer Ubuntu Software:


14 August, 2024

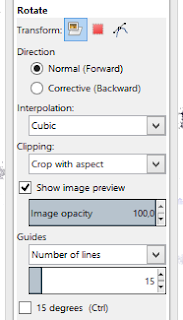
Rotate an Image in Gimp

Crop with aspects:

Source = docs.gimp.org

Gimp Image > Canvas Size

Resizing the Canvas in Gimp:

Source = www.docs.gimp.org

Rotating Without Cropping in Gimp

Using Option "ADJUST":


Source = youtube

Image Rotation in Gimp

Resizing the Canvas:

If you want to adjust the canvas size to fit your newly rotated image, you can increase the canvas size to include all parts of your image. To increase the canvas size, you can click on the chain icon next to the width and height values to link them, and then enter a larger value for either one. This will resize the canvas proportionally and center your image.


Source = https://www.gimp-forum.net/Thread-Image-rotation-newbie-question
21 December, 2022

GIMP Tutorial

Perspective Tool:

05 October, 2015

How to remove watermarks via GIMP

This is an intelligent way to replace an undesirable object in a picture by its surrounding pixels using GIMP:
  • use the magic wand or lasso tool to select area to be removed (click Strg key to add areas as necessary)
  • chose Select → Grow → 1 pix (if needed)
  • then use either:
    • Clone tool
    • or Filters → Map → Resynthesize…
    • or Filters → Enhance → Heal selection…
      • Specify the radius to take the selection from. The default is 50 and should work fine. If it doesn’t, play around with the radius until you get the desired result.
  • chose Shift+Strg+A to unselect area

Rotate Image:

  • Select the relevant area
  • Press Shift+R
  • Click with the mouse anywhere on the image to bring up the input window
  • Press or chose "Rotate"

Perspective Tool:

Helpful video for using Shift+P. Make sure here to always use "Corrective (Backward)" option.

03 July, 2013

Photoshop: Tips & Tricks

  • 500 pixels = 17.64 cm = 6.944 inches
  • Strg+ Left click on layer to select a marquee around the shape in that layer
  • Image à Adjust à Desaturate (Shift+Strg+U): extracts colors out of the selected picture (depleting the image into a black & white mode)
  • Layer à Overlay: makes layer transparent
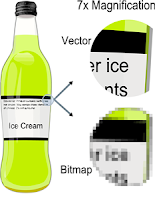
  • Rasterizing a layer: converting it into pixels to make it a paintable layer and looking pixelated so you may apply any filter to blur, distort or add texture to your picture. Once the layer is rasterized, it becomes a bitmapped image consisting of a series of tiny squared pixels. The opposite is a vectored graphic made of hundreds of thousands of tiny lines or curves which always appear smooth when enlarged e.g. font size. File types: .drw, .pif, .pct, .ps, .eps, .svf, .ai, .ait, .art, .cdr, .cdrw, .cdt, .pat, .dlg, .do, .odg. Photographs (.png, .tiff, .psd) are not vector graphics.
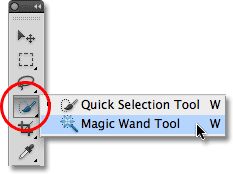
  • To conveniently highlight an area of similar color, use Quick Selection Tool / Magic Wand Tool (W)
  • Right click on desired layers and choose Duplicate Layer
  • Use the Blur tool (R) to touch up the outside edge of a foreground, especially where the image seems pixelated. This will help to create a sense of transition between your foreground and background which is easier on the eye.
  • To blur an image in Photoshop, select the area then choose from the main menu Filter > Blur > Blur: The Blur filter smooths the transition between color changes. The "Blur More” produces the same effect at about three times the strength of just “Blur.”
    • Use Strg+F to repeat last command
    • Or choose from main menu Filter > Blur > Gaussian Blur: play around with different blur radii to create the background effect you want. The larger the radius, the blurrier the image, so for a subtle effect, aim low.
    • Or choose from main menu Filter > Blur > motion Blur: modify "distance in pixel" value to desired fuzziness level displayed in the preview window then click OK
  • Use Paint Bucket Tool (G) to fill selection with color
  • With the Eraser Tool (E), adjust its opacity (expressed as a percentage) to influnece its removal efficacy. To erase as thoroughly as possible, use a high percentage value. But for edges, a low opacity can be used to create a softer, subtler effect. Applying low-opacity eraser repeatidely over the same ares has a cumulative effect, so opt for low opacity where necessary.
  • With the Lasso Tool (L), adjust its feather (measured in pixels) to soften the edges of your selection, making the edges subtler and more forgiving. A good starting value is between 1 and 3 pixels. The higher the number, the softer your edges will become. To add to an already-completed selection, hold down the Shift key while continuing to select. To subtract from an already-completed selection, hold town the Alt key and select the area to unselect.


How to straighten a picture in Photoshop

  • Select Measure Tool under Eyedropper „I" from palette
  • Click and drag a line along the currently-incorrect horizon
  • Chose Image à Rotate Canvas à Arbitrary à OK
  • If necessary, "crop" the picture to remove excessive background


Source = YouTube Video

10 June, 2013

FotoShop Tutorial

To fill an area with color:
  • choose magic wand tool (W)
  • set tolerence = 1 then click on desired area
    • to preserve text, choose lasso tool (L) then
    • click on “add to selection”and
    • click, drag & let go around a label to enlarge your selection
  • choose PaintBrush tool (B)
  • select desired brush size
  • set painting mode = multiply {to preserve text}
  • paint with cursor
  • select è deselect (Ctrl+D) when done

27 May, 2013

Tutorial to create a transparent background in Photoshop

First if the layer is locked (padlock icon), unlock it by double-clicking on it.
  • Method 1:

    • select Magic Wand Tool (hit W)
    • click on white background you wish to remove
    • hit Del-key " (Entf or backspace) to delete it
  • Method 2:

  • This option is only available in version 7 or higher:
    • select "Quick Selection Tool" from magic wand menu (hit W)
    • click and drag around the area you wish to keep
    • copy the chosen area (Strg+C); click on eye icon to hide current layer
    • create a new {2nd} layer and paste clipboard into it (Strg+V)
    • delete original {1st} layer
  • Method 3:

    • click on "Select" è "color range" from drop-down menu. The cursor is already in sample mode (pipette) by default.
    • using the colour-picker, chose white area in picture to select the background including all white pixels in entire photo (PS: white area in "color range" sub-window shows selected pixels; black indicates unselected parts)
    • click on ok to release the eyedropper-tool and close "color range" sub-window. Then:
        • either hit Del-key (Entf or backspace) to delete selection
        • or click on "Select" è "Inverse" (Strg+Alt+I) to copy/paste area to new layer
    • if there are any more white bits still left to remove:
        • click on "Select" è "color range" from drop-down menu
        • chose "highlights" from drop-down menu inside "color range" sub-window
        • click on "ok" to close "color range" sub-window
        • use "Eraser" tool (E) to apply it to selection by clicking the rubber circle on highlighted area
        • hit Strg+D to deselect area
  • Method 4:

    • select "magnetic lasso tool" by right clicking on lasso tool then choosing the magnetic lasso tool from the popup menu
    • select the area you wish to keep by clicking left-mouse-button along the edge of the desired shape until you loop it back on itself
    • every left-mouse-button click creates a bullet point to remember the path. Hit Del-key (Entf or backspace) to delete previous bullet points; if wrongly placed
    • make sure last click is on top of original starting-point to complete area
    • choose "Inverse" (Strg+Alt+I) then hit Del-key (Entf or backspace) to delete selection
  • Using GIMP:

    • select: Layer » Transparency » Add Alpha Channel
    • delete background
    • export as PNG format

Additional notes:

  • Use Strg+D anytime to deselect chosen area.
  • Definition of "Anti-alias": when this option is selected, it will gradually smooth out the edges around the colored areas affected.
  • Definition of "Tolerance": The Tolerance setting determines how different a color can be from the sampled color. When using the eraser or wand tool, set the tolerance based on the sampled color. The lower, the stricter! A lower tolerance limits erasing to the sample color and colors similar to it. If you increase the tolerance, the eraser brush will begin erasing more than just the sampled colors.
  • Pictures containing transparent background can be saved in a variety of formats including GIF {poor quality}, TIFF, PNG {better quality}, SVG and PSD. Whereas JPG and BMP formats do not support transparency.
    • GIFs only support up to 256 colours. This is why your quality is degrading. There is no way around this.
    • The GIF format is not as good at compression as JPEG or PNG.
    • GIFs are quite large or badly compressed files.
    • PNG format is recommended for preserving transparency
    • use GIF to animate layers
  • If you find ugly edges around the image when you place it against a different background color, apply this solution.
Credit: Source

Related Useful Links:

15 April, 2013

Easter 2013

020-Easter by Gary Kilo
020-Easter, a photo by Gary Kilo on Flickr.
Korben, my grand-nephew

11 April, 2013

NGC2237 The Rosette Nebula reprocess


Our earliest asian/affrican stone-aged ancestors on American continent migrated down the Pacific coast by boat some 15'000 years ago. Later, in 1492 europeans arrived from the East.

alice roberts
Winter Triangle:


Summer Triangle:

Sophie Baptism

55-SophieBaptism05-SophieBaptism10-SophieBaptism15-SophieBaptism20-SophieBaptism25-SophieBaptism
30-SophieBaptism35-SophieBaptism40-SophieBaptism45-SophieBaptism50-SophieBaptism60-SophieBaptism
65-SophieBaptism70-SophieBaptism75-SophieBaptism80-SophieBaptism85-SophieBaptism90-SophieBaptism
Sophie Baptism, a set on Flickr.