Strg+ Left click on layer to select a marquee around the shape in that layer
Image à Adjust à Desaturate (Shift+Strg+U): extracts colors out of the selected picture (depleting the image into a black & white mode)
Layer à Overlay: makes layer transparent
Rasterizing a layer: converting it into pixels to make it a paintable layer and looking pixelated so
you may apply any filter to blur, distort or add texture to your picture. Once
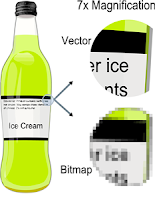
the layer is rasterized, it becomes a bitmapped image consisting of a series of
tiny squared pixels. The opposite is a vectored graphic made of hundreds of
thousands of tiny lines or curves which always appear smooth when enlarged e.g.
font size. File types: .drw, .pif, .pct, .ps, .eps, .svf, .ai, .ait, .art,
.cdr, .cdrw, .cdt, .pat, .dlg, .do, .odg. Photographs (.png, .tiff, .psd) are
not vector graphics.
To conveniently highlight an area of similar color, use Quick Selection Tool / Magic Wand Tool (W)
Right click on desired layers and choose Duplicate Layer
Use the Blur tool (R) to touch up the outside edge of a foreground, especially where the image seems pixelated. This will help to create a sense of transition between your foreground and background which is easier on the eye.
To blur an image in Photoshop, select the area then choose from the main menu Filter > Blur > Blur: The Blur filter smooths the transition between color changes. The "Blur More” produces the same effect at about three times the strength of just “Blur.”
Use Strg+F to repeat last command
Or choose from main menu Filter > Blur > Gaussian Blur: play around with different blur radii to create the background effect you want. The larger the radius, the blurrier the image, so for a subtle effect, aim low.
Or choose from main menu Filter > Blur > motion Blur: modify "distance in pixel" value to desired fuzziness level displayed in the preview window then click OK
Use Paint Bucket Tool (G) to fill selection with color
With the Eraser Tool (E), adjust its opacity (expressed as a percentage) to influnece its removal efficacy. To erase as thoroughly as possible, use a high percentage value. But for edges, a low opacity can be used to create a softer, subtler effect. Applying low-opacity eraser repeatidely over the same ares has a cumulative effect, so opt for low opacity where necessary.
With the Lasso Tool (L), adjust its feather (measured in pixels) to soften the edges of your selection, making the edges subtler and more forgiving. A good starting value is between 1 and 3 pixels. The higher the number, the softer your edges will become. To add to an already-completed selection, hold down the Shift key while continuing to select. To subtract from an already-completed selection, hold town the Alt key and select the area to unselect.