- 500 pixels = 17.64 cm = 6.944 inches
- Strg+ Left click on layer to select a marquee around the shape in that layer
- Image à Adjust à Desaturate (Shift+Strg+U): extracts colors out of the selected picture (depleting the image into a black & white mode)
- Layer à Overlay: makes layer transparent
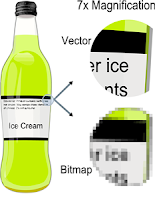
- Rasterizing a layer: converting it into pixels to make it a paintable layer and looking pixelated so you may apply any filter to blur, distort or add texture to your picture. Once the layer is rasterized, it becomes a bitmapped image consisting of a series of tiny squared pixels. The opposite is a vectored graphic made of hundreds of thousands of tiny lines or curves which always appear smooth when enlarged e.g. font size. File types: .drw, .pif, .pct, .ps, .eps, .svf, .ai, .ait, .art, .cdr, .cdrw, .cdt, .pat, .dlg, .do, .odg. Photographs (.png, .tiff, .psd) are not vector graphics.
- To conveniently highlight an area of similar color, use Quick Selection Tool / Magic Wand Tool (W)
- Right click on desired layers and choose Duplicate Layer
- Use the Blur tool (R) to touch up the outside edge of a foreground, especially where the image seems pixelated. This will help to create a sense of transition between your foreground and background which is easier on the eye.
- To blur an image in Photoshop, select the area then choose from the main menu Filter > Blur > Blur: The Blur filter smooths the transition between color changes. The "Blur More” produces the same effect at about three times the strength of just “Blur.”
- Use Strg+F to repeat last command
- Or choose from main menu Filter > Blur > Gaussian Blur: play around with different blur radii to create the background effect you want. The larger the radius, the blurrier the image, so for a subtle effect, aim low.
- Or choose from main menu Filter > Blur > motion Blur: modify "distance in pixel" value to desired fuzziness level displayed in the preview window then click OK
- Use Paint Bucket Tool (G) to fill selection with color
- With the Eraser Tool (E), adjust its opacity (expressed as a percentage) to influnece its removal efficacy. To erase as thoroughly as possible, use a high percentage value. But for edges, a low opacity can be used to create a softer, subtler effect. Applying low-opacity eraser repeatidely over the same ares has a cumulative effect, so opt for low opacity where necessary.
- With the Lasso Tool (L), adjust its feather (measured in pixels) to soften the edges of your selection, making the edges subtler and more forgiving. A good starting value is between 1 and 3 pixels. The higher the number, the softer your edges will become. To add to an already-completed selection, hold down the Shift key while continuing to select. To subtract from an already-completed selection, hold town the Alt key and select the area to unselect.

